2015/10/31

We belong together - Halloween card | Lawn Fawn

Hello dear crafters! As promised I show you the last Halloween card for this year!!!
This one actually is for my boyfriend because every year he asks for a Halloween card and of course he gets a special one :)


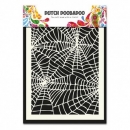
For the background I used a spiderweb stencil and the distress inks seedless preserves and spiced marmelade which I blended together. I was quite surprised by how seedless preserves turned out in combination with the bright orange, I think I expected that there will be more violet but I like the result anyway.

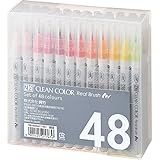
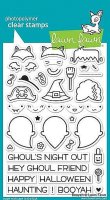
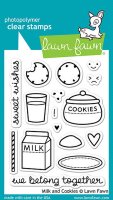
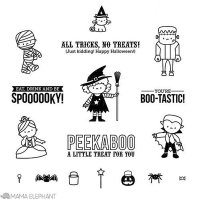
I stamped and created two Frankenstein ghosts from the 'Booyah' stamp set from Lawn Fawn and colored them in with Zig clean color real brush markers. The sentiments are from the 'Milk and Cookies' stamp set from LF and 'Bootastic' from Mama Elephant (the tiny Halloween greeting). I stamped them both with Versamark ink on black cardstock and heat embossed them with white embossing powder.Then I fuzzy cut the images and adhered them with foam tape to the card. I did the same with the greetings. 


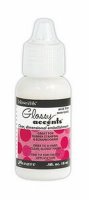
I didn't want to cover my background too much because of the nice colors and the spiderweb; therefore, I only added some black hearts and one little spider using the 'Booyah' stamp set again. I covered the hearts with clear Wink of Stella glitter and glossy accents and my card was finished.

I wish you all a 'spooky' Halloween and happy haunting!!

Thank's for stopping by and I'll see you soon!

xo
Lisa

Supply List


Unfortunately I wasn't able to copy in the image of the Zig markers as usual, so click here for the link.
The Zig clean color brush markers I used: 010, 028, 043, 046, 050, 052, 070, 091, 093, 094

2015/10/29

Happy Birthday | Mama Elephant October Challenge

Hello there! November is coming soon so I hurry up and share my card for the Mama Elephant October Challenge. The challenge was to create a birthday card and I couldn't resist using the adorable little penguins from the brand new 'Christmas Spirit' stamp set. They are sooo cute, I immediately fell in love with them ♥


So for my card I used a watercolor paper and created my own mask with the negative diecut pieces of the landscape trio die (I used the hill boarders). 


Then I stamped the cute images with ranger archival jet black ink and fuzzy cut masks for them as well. After masking them off I colored the background using the soft granite shadow ink from Hero Arts and an ink blending tool and sprinkled it with distress inks in cracked pistacchio and peacock feathers. I then could remove the masks and colored my images with Zig clean color real brush markers.

I also added two of the penguins under the penguin border (again using masking and Zig clean color real brush markers). From the 'Woodland Gift' stamp set I stamped the balloon and greeting. To match the wavy border I curved the sentiment stamp on my acrylic block. 

For finishing my card up I added wink of stella to the presents and also (together with glossy accents) to the balloon. I chose some enamel dots in the same color combination and added them around the greetings.
Last but not least I adhered the watercolor paper to a dark grey cardstock and then to a standard-size orange card base.


I hope you like this happy card and I'll see you on Saturday for my last Halloween card this year!!! Have a nice week,
xo
Lisa

Supply List


Zig clean color brush markers: 031, 036, 038, 042, 052, 070, 090, 091
Additional supplies: Hero Arts - soft granite shadow ink, My Mind's Eye - Cut&Paste Smile Enamel Dots, Mitsubishi - Uniball pen black 

2015/10/27

Lawnscaping Challenge #116 | Too cute to spook

Hello and welcome back! This week I am going to share three cards with you because of two challenges that end in October.
The first card is for the Lawnscaping challenge #116 'Too cute to spook'. I created a Halloween card with cute winter critters.


For the background I used the ink smooshing technique where you use distress ink or watercolor, add water to it and pick up the color with a sheet of acetate or something similar. Then you press that actetate down to your watercolor paper. Doing so, you really can influence and control where the color will be and prevent a total mess :)
For this particular project I used 3 distress inks: tumbled glass, broken china and cracked pistacchio. I really like this color combination for winter/snowy scenes!!

While letting the color dry I stamped some critters and the igloo from the 'critters in the snow' stamp set from Lawn Fawn. I combined them with some accessories of the newer 'booyah' stamp set. For the coloring I used Copic markers and for some interest I added glitter with the Wink of Stella pen to the accessories.


For the snow I diecut white cardstock using the landscape trio dies from Mama Elephant. After cutting out all the elements I adhered them to the background and added the sentiment from the 'booyah' stamp set and some stars with Lawn Fawn dye ink.

Thank you for stopping by and I'll see you very soon :)
xo
Lisa


Supply List


Copics I used: 0, C1, C3, C5, C7, E00, E37, E59, R20, R27, R46, W1, W3, W5, W7, YR16, Y17 

2015/10/24

Happy Christmas | Lawn Fawn


Hello and happy Saturday! It's time for another Christmas card. I created an interactive card, similar to the Halloween card which I posted about two weeks ago. Click here to see the Halloween card.


For the Christmas I card I used the 'winter penguin' stamp set from Lawn Fawn. I stamped the penguin with Memento tuxedo black ink and colored it in with Copic markers and the Wink of Stella pen.
For the background I used the let's bokeh in the snow paper pad and cut out a strip which is slightly narrower than a small coin. I also diecut a cloud border from white cardstock using the landscape trio dies from Mama Elephant. For the ice I used a pattern paper from the Avery Elle neutrals collection paper pad and diecut a stitched line to match the ice with the cloudy border.


I also adhered the same paper from Lawn Fawn directly to my white cardbase so that the white isn't showing through the slit. Then I created a coin-foamtape-coin construct (you can also see this in the Halloween post to which I linked to at the top) and clued my Penguin to it. I used glossy accents for this because it is a nice strong adhesive.


In the next step I adhered the whole interactive card front with foam tape to my cardbase and scattered some sequins and also snowflakes which I diecut with the mini snowflake die from white cardstock. For the sentiment I used the 'Oh snap' stamp set and the lobster LF dye ink. I also added the heart from the set with the same ink and used enamel dots to ground my sentiment.


I think the person who will receive this card will have a lot of fun with this interactive design!

I hope you liked the inspiration and I'll see you next week where I show you some Halloween cards again :)
xo
Lisa

Suppy List


Copic marker I used: 0, C1, C5, C7, R20, R27, R46, Y17, Y38